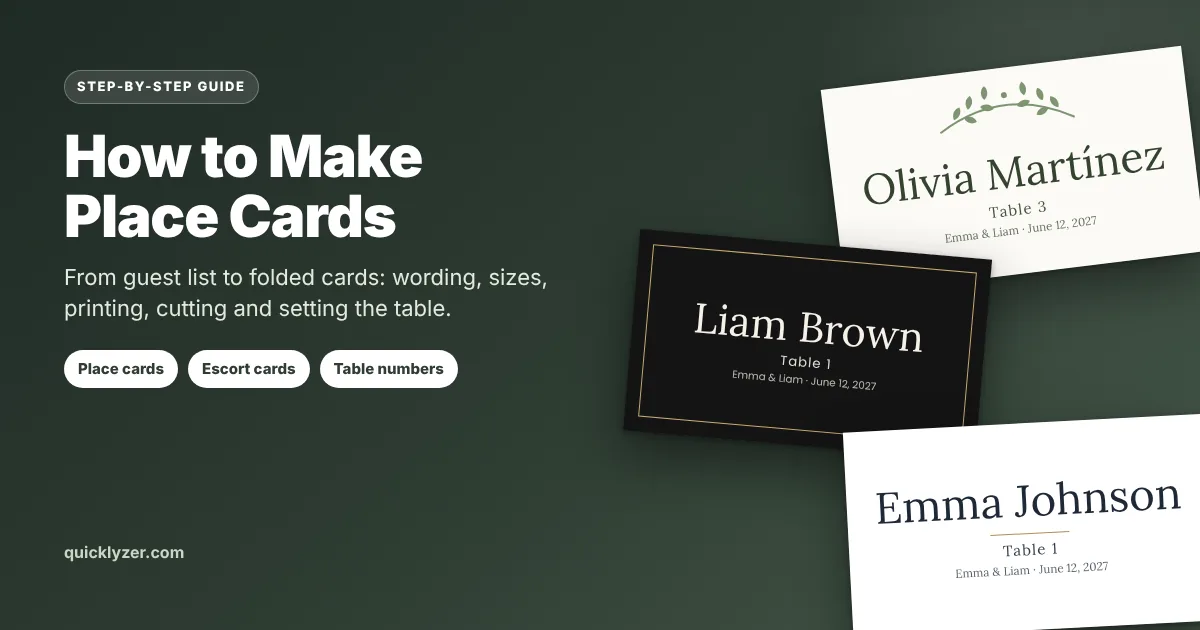
Place cards look like the smallest job on the event list, until you sit down with eighty names, a stack of card stock and a printer that refuses to line anything up. This guide covers the whole process: deciding which cards you actually need, wording names correctly, preparing the list, designing and printing at home, then cutting, folding and setting the table without a last-minute panic. It works for weddings, rehearsal dinners, holiday meals, galas and business dinners alike.
The examples use our free Place Card Maker, which builds every card from a single guest list in your browser. The advice on etiquette, paper, cutting and table setting applies whatever tool or template you end up using.
Place cards, escort cards or table numbers: what do you need?
These three cards are easy to mix up, and each one answers a different question for your guests. Escort cards answer “which table?”, place cards answer “which chair?”, and table numbers answer “where is that table?”.
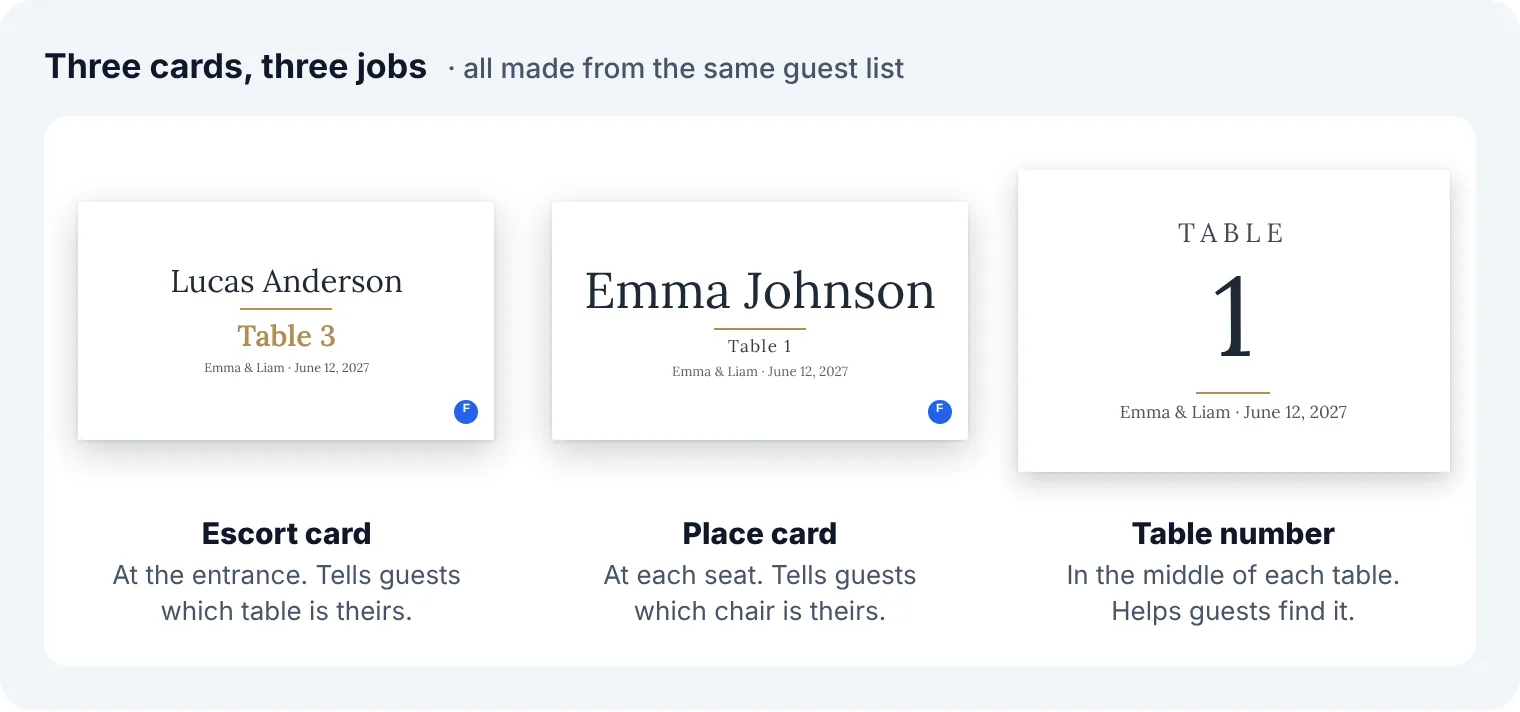
You rarely need all three. Use this as a starting point:
| Your event | What works best | Why |
|---|---|---|
| One long table or a dinner party at home | Place cards only | Everyone is already at the right table; they only need their chair. |
| Several tables, guests free to choose a seat | Escort cards (or a seating chart) + table numbers | Guests find their table, then sit wherever they like there. |
| Plated meal with pre-ordered entrées | Escort cards or a chart + place cards with meal markers + table numbers | Servers need to know exactly which seat gets which plate. |
| Buffet or family-style service | Escort cards or a chart + table numbers; place cards optional | No one serves to a specific chair, so exact seats matter less. |
| Business dinner or conference meal | Place cards (both sides printed) + table numbers | People sitting opposite can read each other's names, which helps networking. |
If you are using a seating chart instead of escort cards, plan it first. Our step-by-step seating chart guide explains how to group guests and arrange tables, and the plan you build in the Seating Chart Maker can be reused to make the cards.
When to make place cards: a realistic timeline
The design can be decided early, but the names cannot. Printing too soon is the classic mistake: a single cancellation or a new plus-one means reprinting a sheet and re-cutting it, often the night before. Work backwards from the event date:
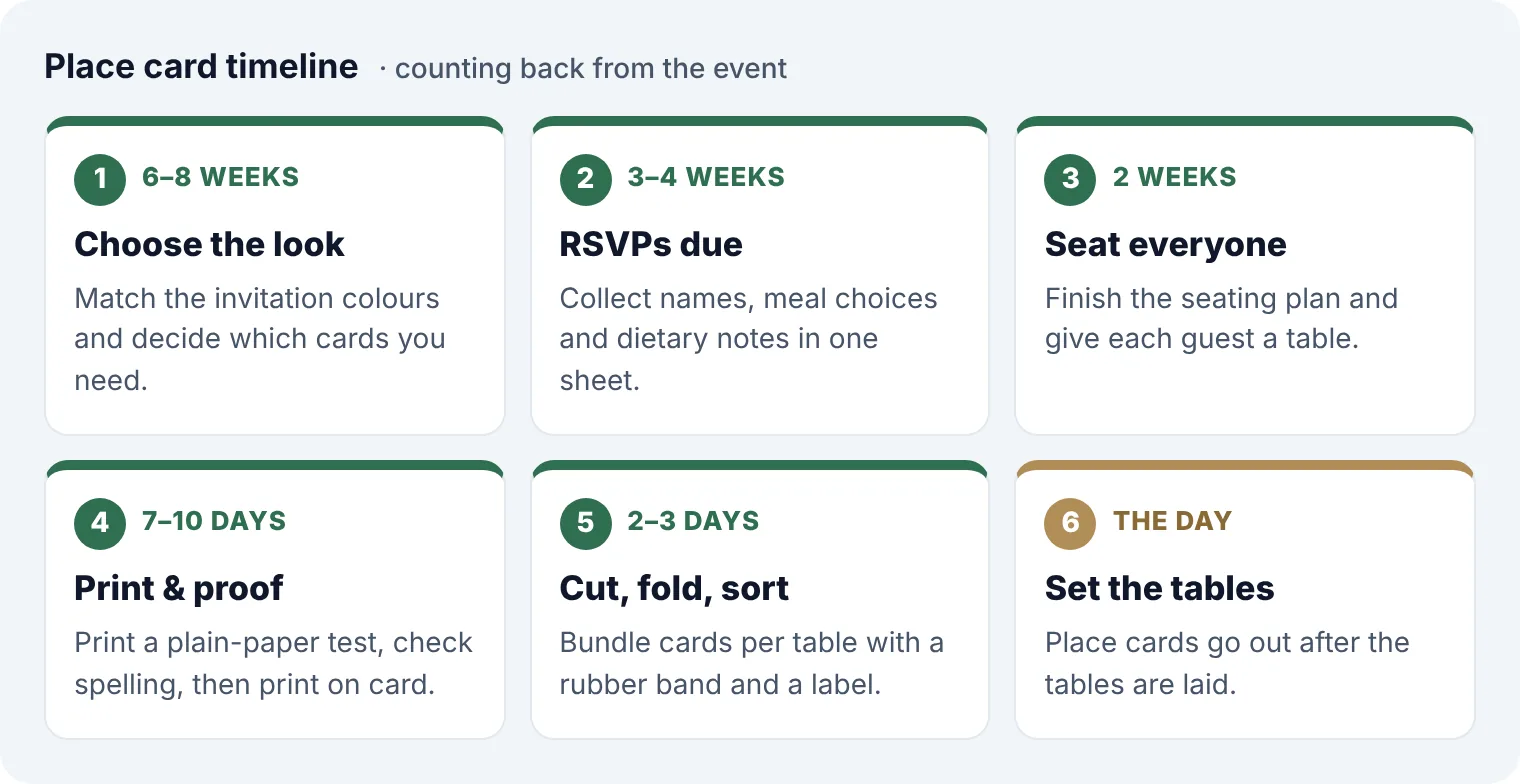
- Design early. Pick colours and fonts that match the invitations and buy the card stock while there is time to order more.
- Print after seating is final. About a week before is the sweet spot: late enough for the list to be stable, early enough to fix mistakes.
- Keep a few spares. Print some blank cards in the same design for guests who appear at the last minute, and keep the design file so one card can be reprinted quickly.
Step 1: Get the guest list into shape
Every card is only as good as the list behind it. A tidy spreadsheet with one row per guest saves hours later. Use these columns:
- Name exactly as it should be printed (or First Name and Last Name in two columns).
- Table, as a number or a name such as “Head Table” or “Lavender”.
- Meal, if guests chose an entrée on the RSVP.
- Dietary notes such as allergies, for the caterer rather than for the card.
Before printing anything, sort the sheet by name and scan for duplicates, missing tables and spelling. Ask a family member to read the names aloud; mistakes in names are far more noticeable on a card than in a spreadsheet.
How to write names on place cards
Choose one style and use it on every card. Mixing “Mr. James Darling” with “Jess” on the same table looks careless even when each card is correct on its own.
| Guest | Formal event | Relaxed event |
|---|---|---|
| Adult guest | Ms. Olivia Martínez | Olivia Martínez |
| Married couple | Mr. Liam Brown / Mrs. Emma Brown, one card for each seat | Liam Brown / Emma Brown |
| Doctor or other title | Dr. Sophia Nguyen | Sophia Nguyen (or keep the title if she uses it socially) |
| Child with their own seat | Miss Mia Clarke / Master Leo Clarke | Mia / Leo (first name only) |
| Plus-one | Ask for the full name and print it | Ask for the name; avoid “Guest of …” |
| Someone known by a nickname | Full name | The name they actually use (Kim rather than Kimberly) |
Every seat gets its own card, including couples. Babies in high chairs do not need one.
Step 2: Bring the list into the place card maker
Open the Place Card Maker, select the rows in your spreadsheet (Excel, Google Sheets or Numbers) together with the header, copy them and paste them into the guest box. The columns are recognised by their headings, so first and last names are joined, tables and meals land in the right place, and dietary notes are kept for the caterer.
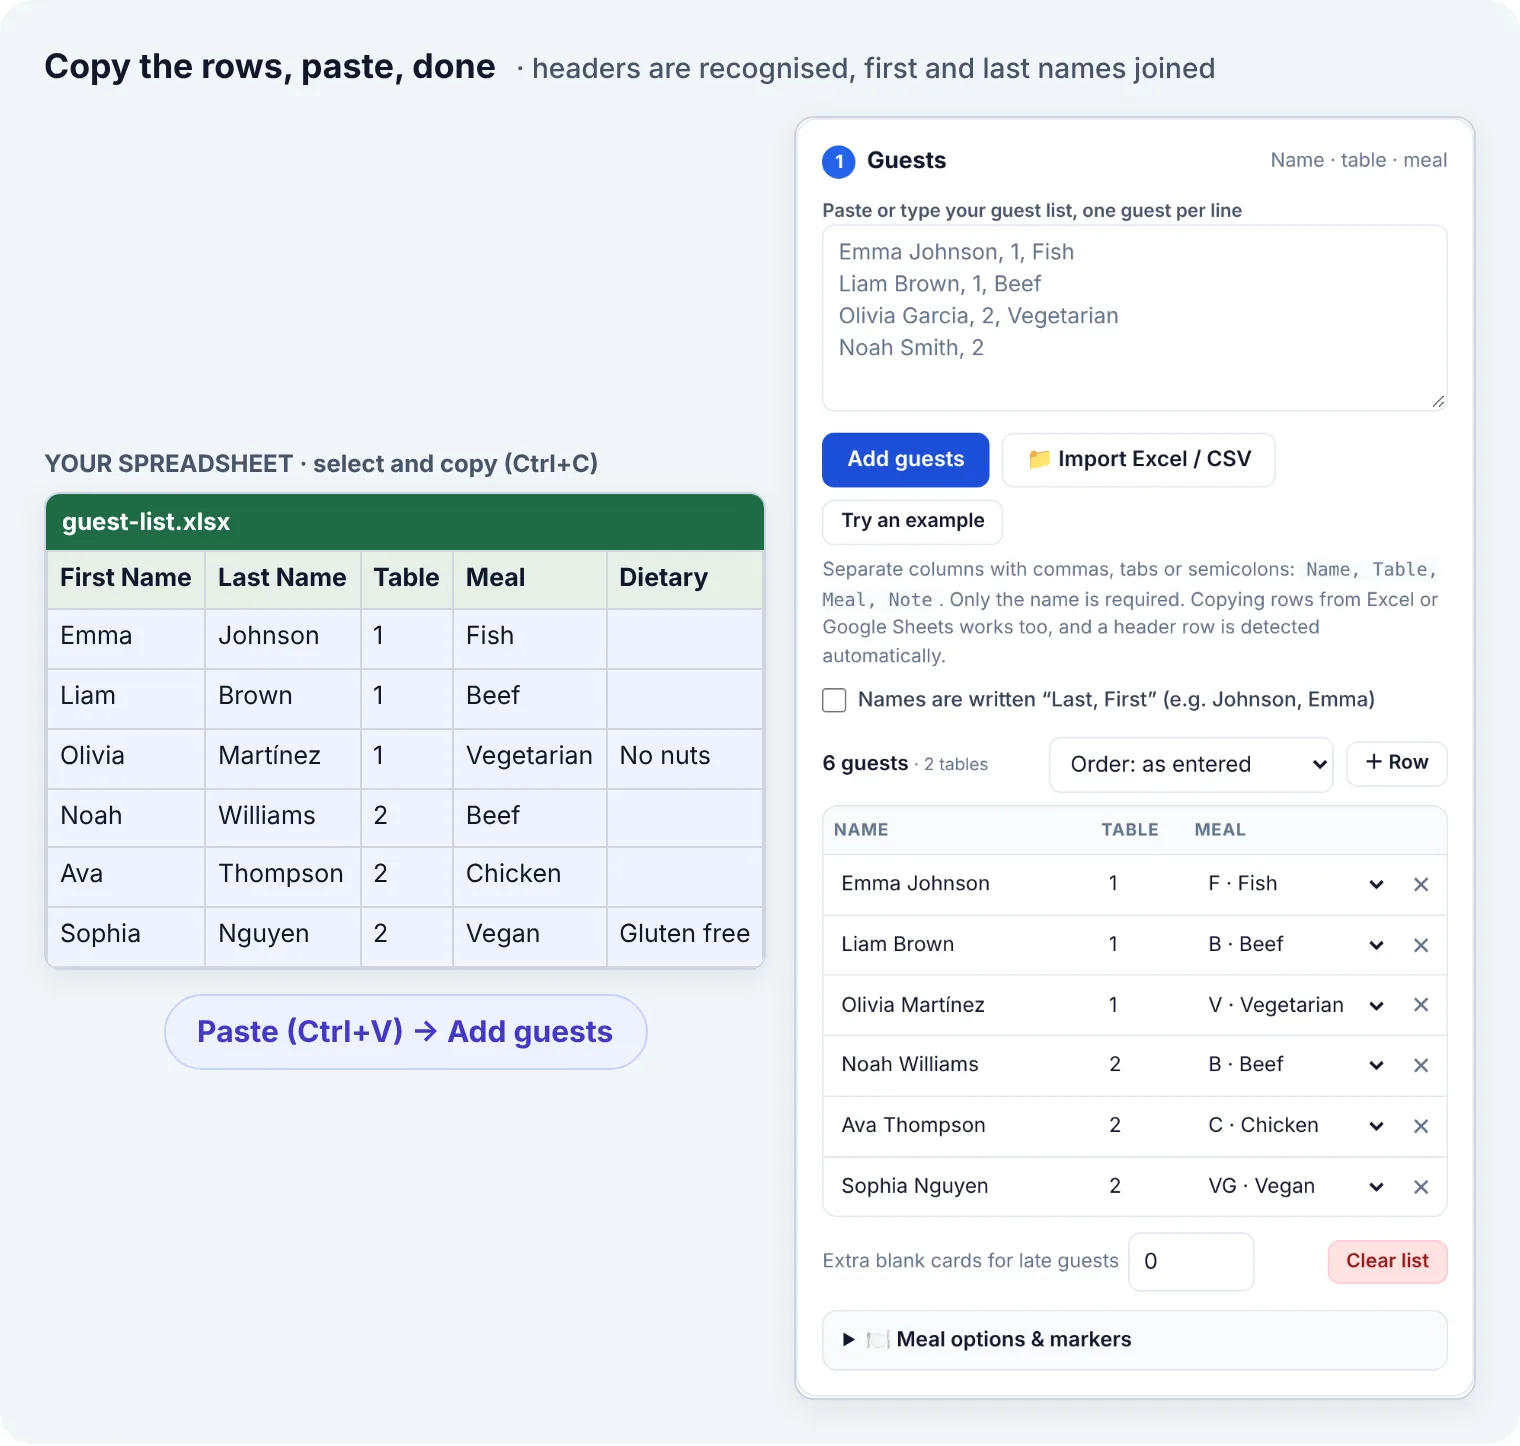
Two shortcuts are worth knowing. If you already arranged tables in our Seating Chart Maker, a banner offers to reuse that plan, so names and table assignments come across in one click. And if your list is a file you received from someone else, use Import Excel / CSV instead of copying.
Before moving on, check the counter under the box. The number of guests and tables should match your seating plan exactly. A name shown in amber appears twice, which usually means a guest was added in two places.
Step 3: Pick a card format and size
Most people want folded tent cards: they stand up on their own and need no holders. Pick flat cards if you have card holders, want to lay the card on a napkin, or plan to tuck it into a favour box.
The standard folded place card has a front of 3.5 × 2 inches, the size of most pre-scored blank cards sold in shops, so your printed cards match any extras you buy. Choose a smaller 3 × 2 in card for crowded tables, a wider 4 × 2 in card for long names, or a larger 4 × 3 in card if you want to add a logo or a monogram.
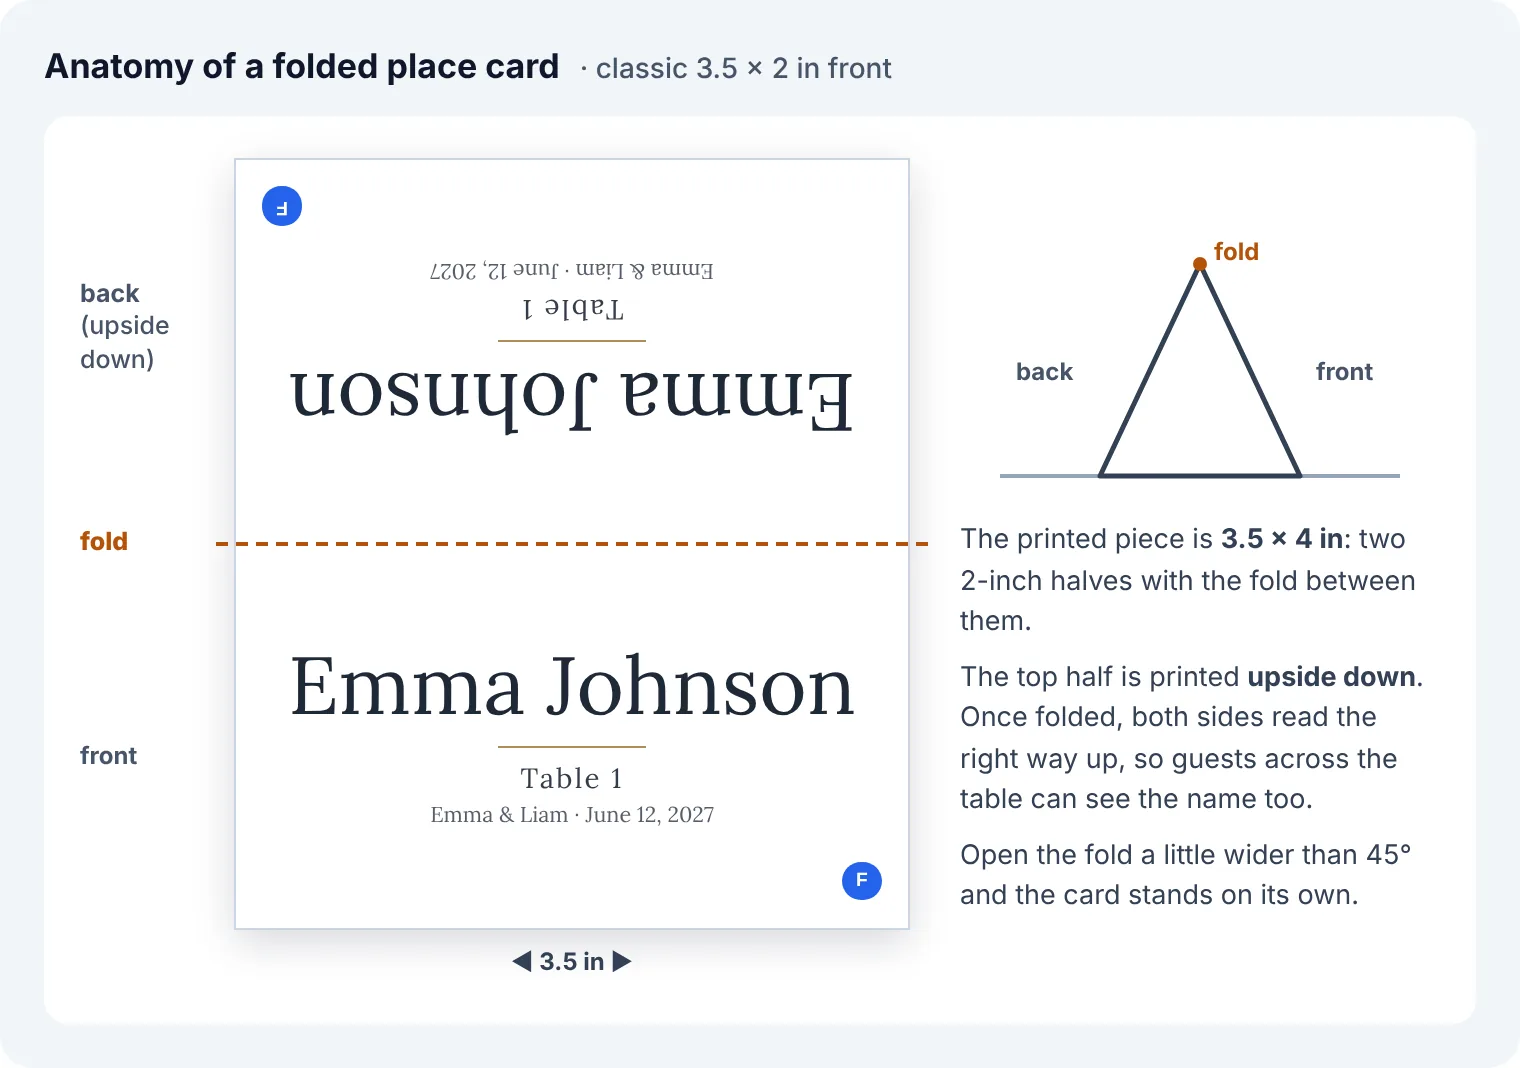
Keep name on both sides switched on for round tables and business events, where people across the table benefit from seeing the name. For a single-sided look, turn it off and the back stays plain in the same colour.
How many cards fit on a sheet
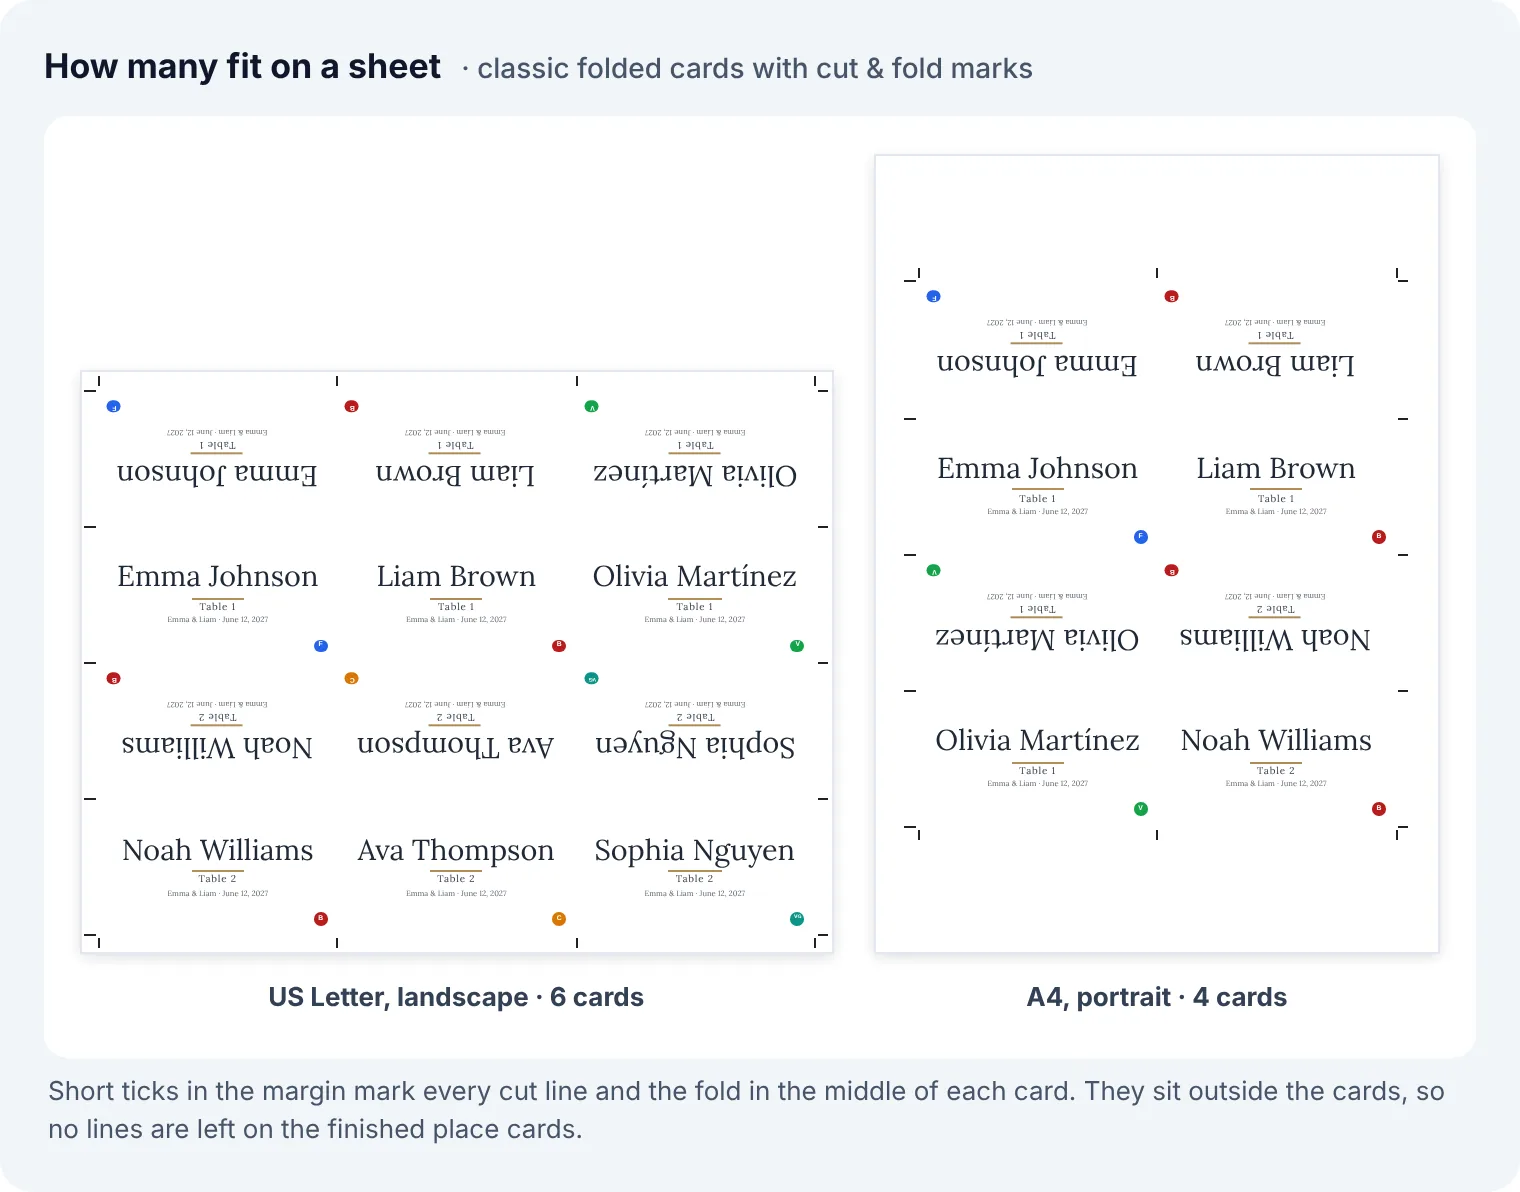
| Card (front size) | Printed piece | Per US Letter sheet | Per A4 sheet |
|---|---|---|---|
| Classic folded, 3.5 × 2 in | 3.5 × 4 in | 6 | 4 |
| Flat, 3.5 × 2 in | 3.5 × 2 in | 12 | 10 |
| Table number, folded 5 × 3.5 in | 5 × 7 in | 2 | 2 |
For a quick estimate of how much card stock to buy, divide your guest count by the cards per sheet, round up, then add two or three sheets for test prints and mistakes. One hundred guests on Letter paper means 17 sheets for the cards plus spares.
Step 4: Design cards that people can actually read
Place cards are read from a standing position, often in candlelight, by guests who may not be wearing their reading glasses. Pretty is good; legible is essential.
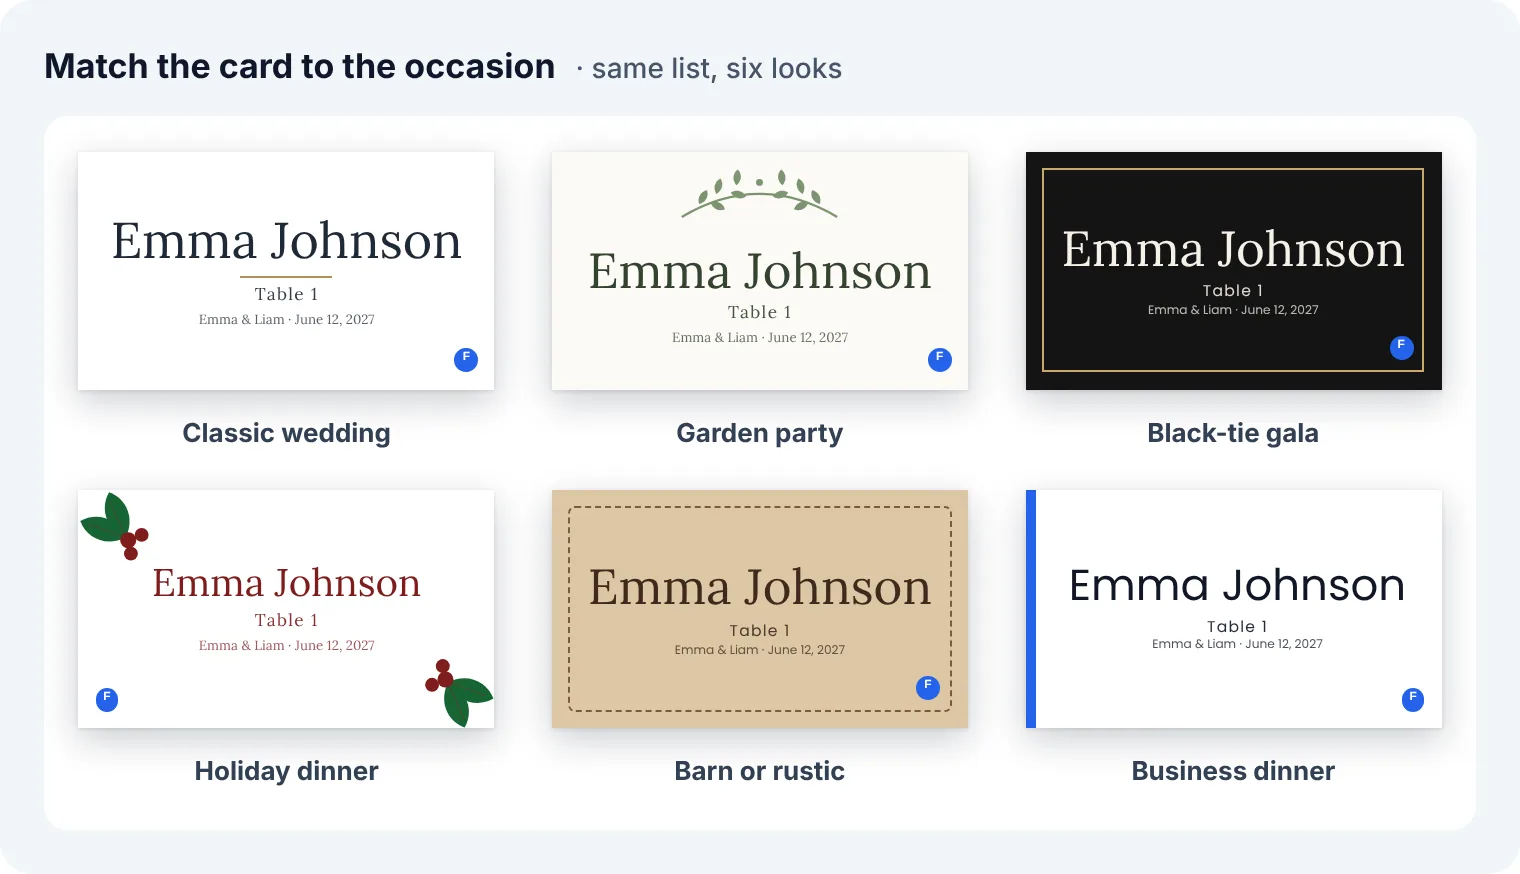
- Contrast first. Dark ink on a light card, or cream ink on black, is easy to read. Gold-on-white or pastel-on-white text fades badly under warm lighting.
- Use script fonts for the name only. Calligraphy styles look lovely at name size but turn into scribbles in a small line of details. Pair a script name with a clean serif or sans serif for the table and the event line.
- Keep the name dominant. The name should be the largest element by far; the table number and an event line such as the couple's names and date sit underneath, smaller.
- Repeat your invitation colours so the place cards, escort cards and table numbers read as one set.
- Print one test card and look at it from about two metres (six feet) away before printing the rest.
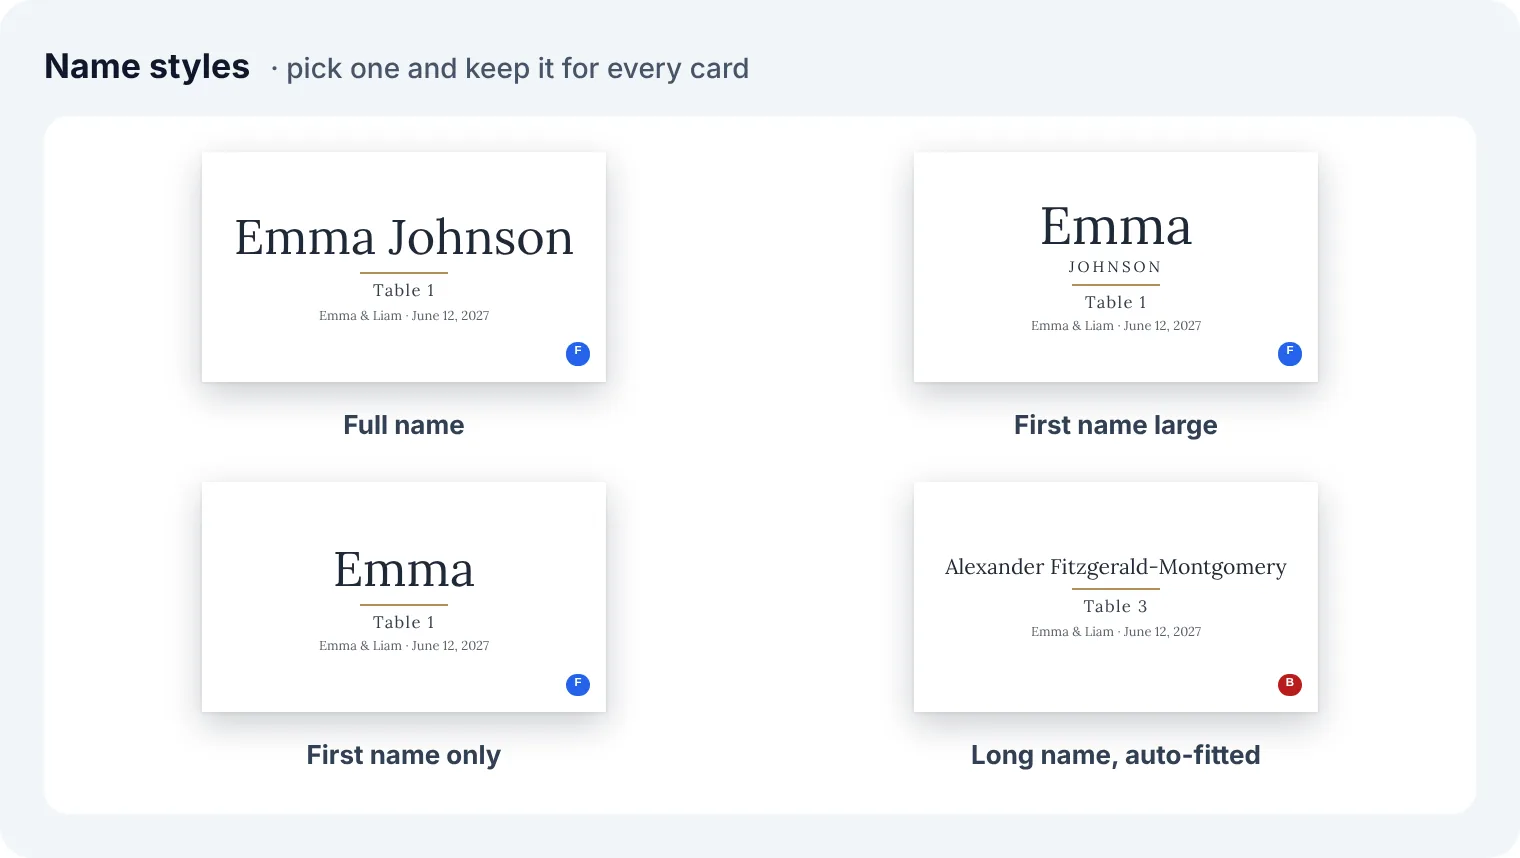
For relaxed dinners, the first name large style is warm and readable while still showing the surname for guests who share a first name. Use first name only for family meals where everyone knows each other.
Step 5: Add meal choices for a plated dinner
If guests picked an entrée when they replied, the place card is where the serving team looks. Keep the marker small and discreet: guests do not need to see what their neighbours ordered, but a server holding three plates should be able to spot “F” for fish in a second.
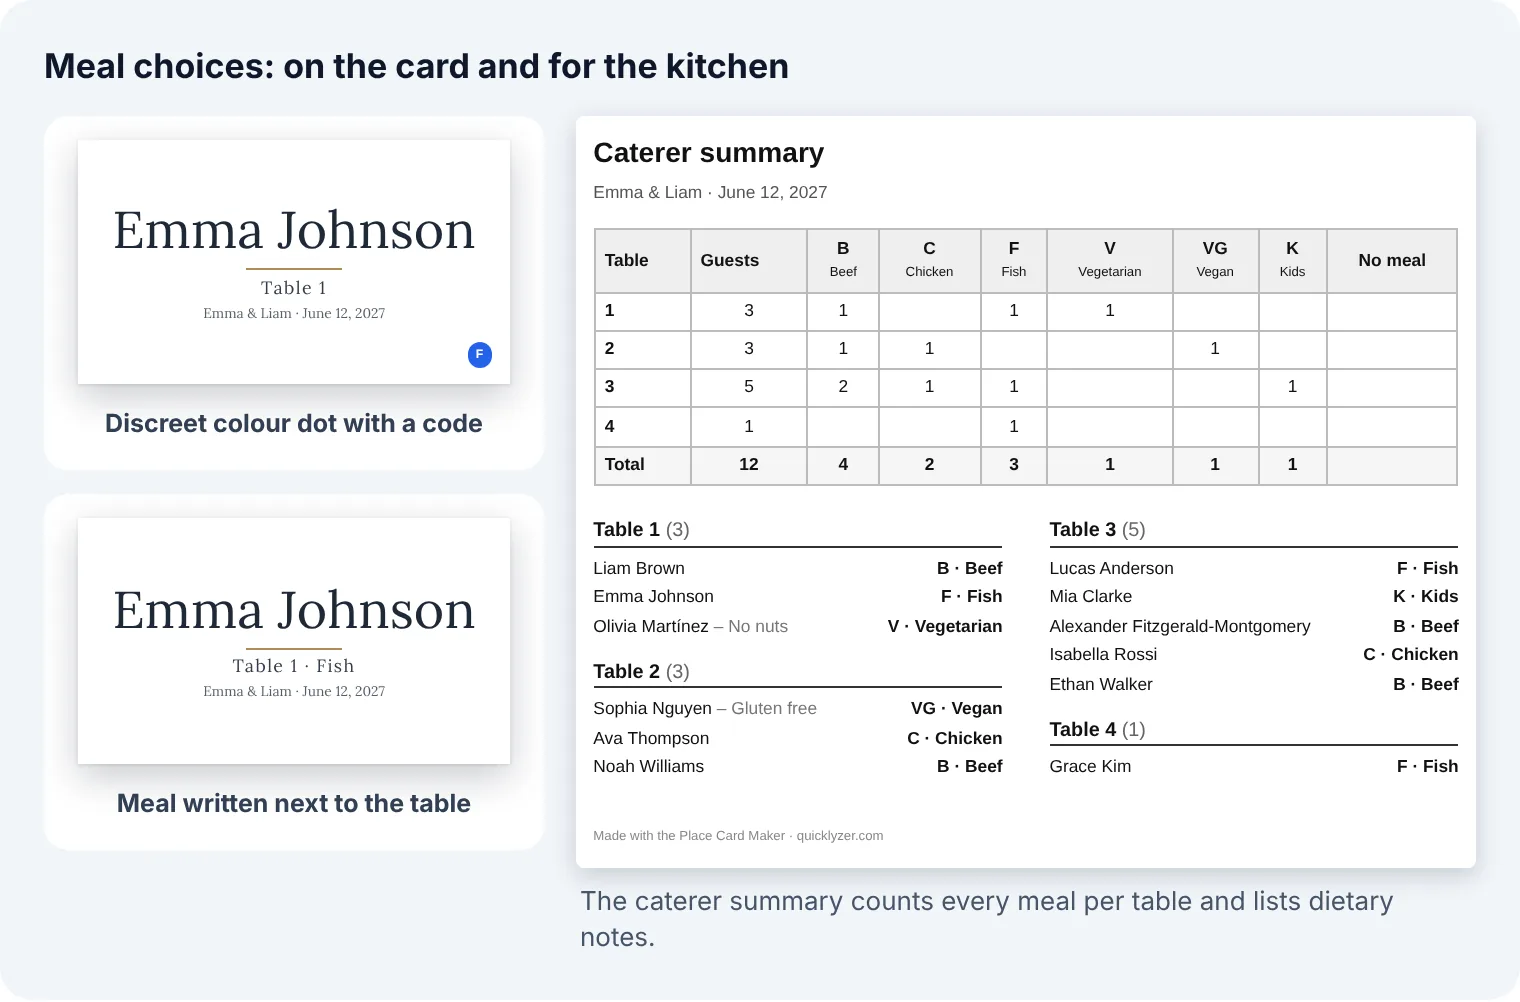
Agree the codes with your caterer before printing and give them the summary sheet with counts per table and the guests' dietary notes. Their head count and your cards should tell the same story, which makes the service far smoother on the night.
Step 6: Print at home without wasting card stock
- Check the scale first. Print the one-page scale test on plain paper and measure the squares. If they are not exactly the right size, change the print setting to 100% or Actual size before going further.
- Proof on plain paper. Print every sheet once on ordinary paper and check the names against your list. Typos are much cheaper to fix now.
- Feed card stock correctly. Use the rear or manual feed tray if your printer has one, and load a few sheets at a time to avoid jams. Most home printers handle matte card up to roughly 250–300 g/m²; check your printer's manual for its limit.
- Choose the right finish. Matte card dries quickly and is easy to write on if you need to add a name later. Glossy or metallic card can smudge with inkjet ink.
- Let the ink dry for a few minutes before stacking sheets, especially with dark backgrounds.
Prefer to have them printed? Save the cards as a PDF from the print window and send it to a print shop. Ask them to print at 100% on your chosen card and to cut along the marks.
Step 7: Cut and fold like a pro
- Cut with a trimmer or a metal ruler and craft knife, not scissors. Line the blade up with the ticks in the margin and cut the whole row in one pass.
- Cut the long lines first, then the short ones. Each cut gives you a straight edge to align the next.
- Score before you fold. Press a firm line along the fold using a bone folder, the back of a butter knife or an empty pen guided by a ruler. Card folds cleanly on a score instead of cracking.
- Fold with the print on the outside and run your thumbnail along the fold to set it.
- Sort as you go. Group the finished cards by table, wrap each stack with a band and a sticky note showing the table number. Whoever sets the room will thank you.
Step 8: Set them on the table
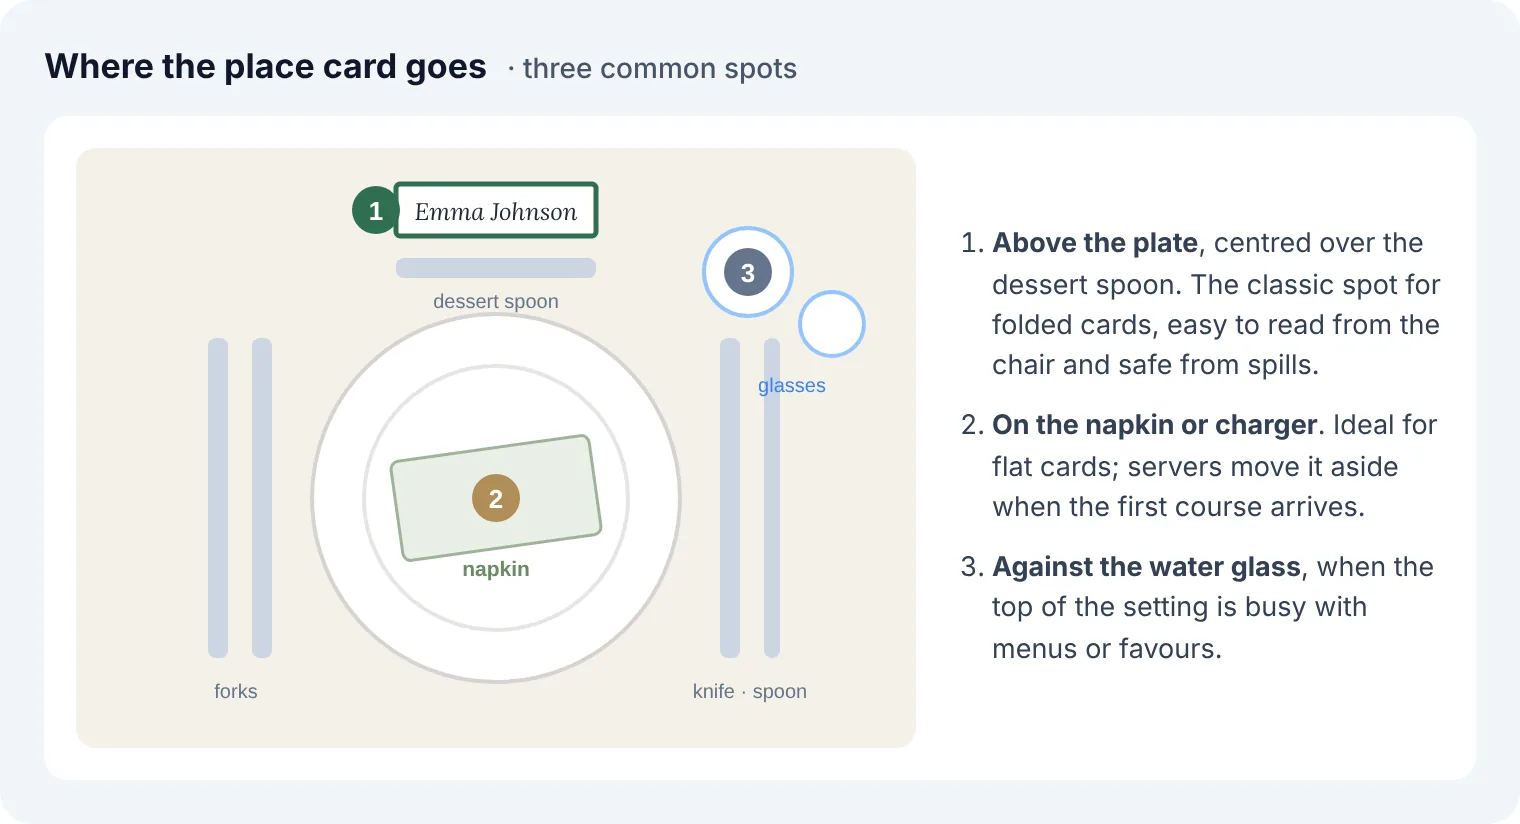
Put the cards out only after the tables are fully laid, so they are not knocked over while cutlery and glasses go down. Work table by table from your sorted stacks and check each table against the seating plan before moving on. Place escort cards on a table near the entrance in alphabetical order by surname, so guests can find theirs in seconds; a printed alphabetical seating list does the same job for a planner or the doorstaff.
Troubleshooting common problems
| Problem | Likely cause | Fix |
|---|---|---|
| Cards print smaller than planned | The print window is scaling to fit the page | Change the scaling option to 100% (some printers call it Actual size) and repeat the scale test. |
| Coloured background is missing | Background graphics are switched off | Tick Background graphics under More settings in the print window. |
| The design is not centred on the card | The printer shifts the paper slightly | Always cut along the printed marks, not by measuring from the paper edge. |
| Cards fall over | Paper too thin or fold not crisp | Use heavier card, score the fold, and open the card a little wider. |
| The printer jams | Card is too thick for the main tray | Feed one sheet at a time through the rear or manual tray. |
| A guest arrives unexpectedly | Late addition | Write the name on one of your blank spare cards in the same design. |
Quick answers
Should a couple share one place card?
No. Each seat gets its own card, so a couple has two cards side by side. Shared cards work for escort cards (“Mr. and Mrs. Brown, Table 4”), not for place cards.
Should the place card include the table number?
It helps. Even when guests already know their table, the number on each card makes it obvious if a card was set on the wrong table, and it helps whoever sets the room. Keep it smaller than the name.
Can I handwrite the names instead?
Yes, and some couples print the design with a blank line and add names in calligraphy. Printing a few blank cards is also the simplest way to cover late changes on the day.
Do we need place cards for a buffet?
Usually not. Escort cards or a seating chart plus table numbers are enough, since no one is serving to a particular chair. Add place cards only if you want to control who sits next to whom.
Your place card checklist
- Decide which cards you need: escort cards or a chart, place cards, table numbers.
- Finalise the guest list, tables and meal choices in one spreadsheet.
- Pick one name style and check spelling with a second person.
- Choose size, template and colours that match your stationery.
- Run the scale test, proof on plain paper, then print on card stock.
- Send the caterer the meal summary.
- Cut along the marks, score, fold and bundle by table.
- Print a few blank spares and pack a pen that matches the ink.
Ready to start? Open the free Place Card Maker, paste your list and you will see the first card take shape in seconds. No account and no watermark, and your guest list stays on your device.