A short screen recording often explains something better than a page of text. Use it to show a colleague a bug, walk a customer through a setting or record a lesson for students who missed class. The trouble is that a first attempt often comes out wrong: the sound is missing, notifications pop up mid-video, the file will not open in an editor, or it is so large you cannot send it.
This guide takes you from a blank screen to a finished, shareable video using our free Screen Recorder, which runs in your browser with nothing to install. Every screenshot below comes from real test recordings. Along the way you will learn which settings fit which kind of video, how to get the sound right first time, and how to fix the problems people run into most.
What You Need Before You Start
- A desktop browser. Chrome or Edge give you the most options, especially for sound. Firefox and Safari can record the screen too, but not the sound playing on your computer (more on this in Step 3).
- A plan, even a rough one. Write down the three or four things you want to show, in order. A one-minute video with a clear point beats ten minutes of wandering.
- A tidy screen. Close unrelated tabs and turn on Do Not Disturb, so no private message pops up in the middle of your video.
- Headphones, if you will talk over something that plays sound.
The Quick Version
- Choose what to record: screen, screen and webcam, camera, or audio only.
- Pick a quality, a file format and a countdown.
- Decide which sounds to include and check the level meters.
- If you appear on camera, place the webcam bubble.
- Press Start Recording, choose a tab, window or screen, and switch on audio sharing.
- Record. Use the shortcuts to pause, take screenshots and stop.
- Review the result, trim it, and save it as MP4, GIF or MP3.
Step 1: Choose What to Record
The four buttons at the top of the recorder decide what ends up in your video. The rest of the settings change to match your choice.
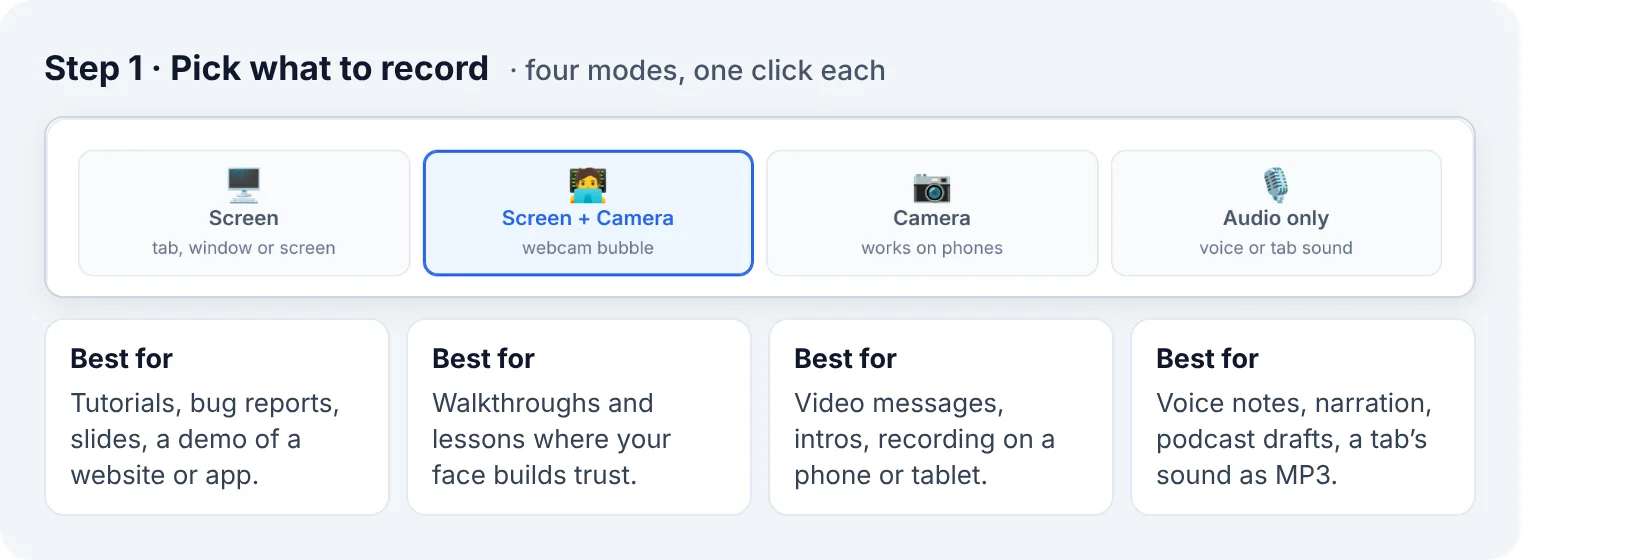
If you are unsure, start with Screen. Add the camera when your face genuinely helps, for example in a course, a sales demo or a personal update. For bug reports and how-to clips, a clean screen with a clear voice-over is usually better.
Step 2: Pick Quality, Format and Timing
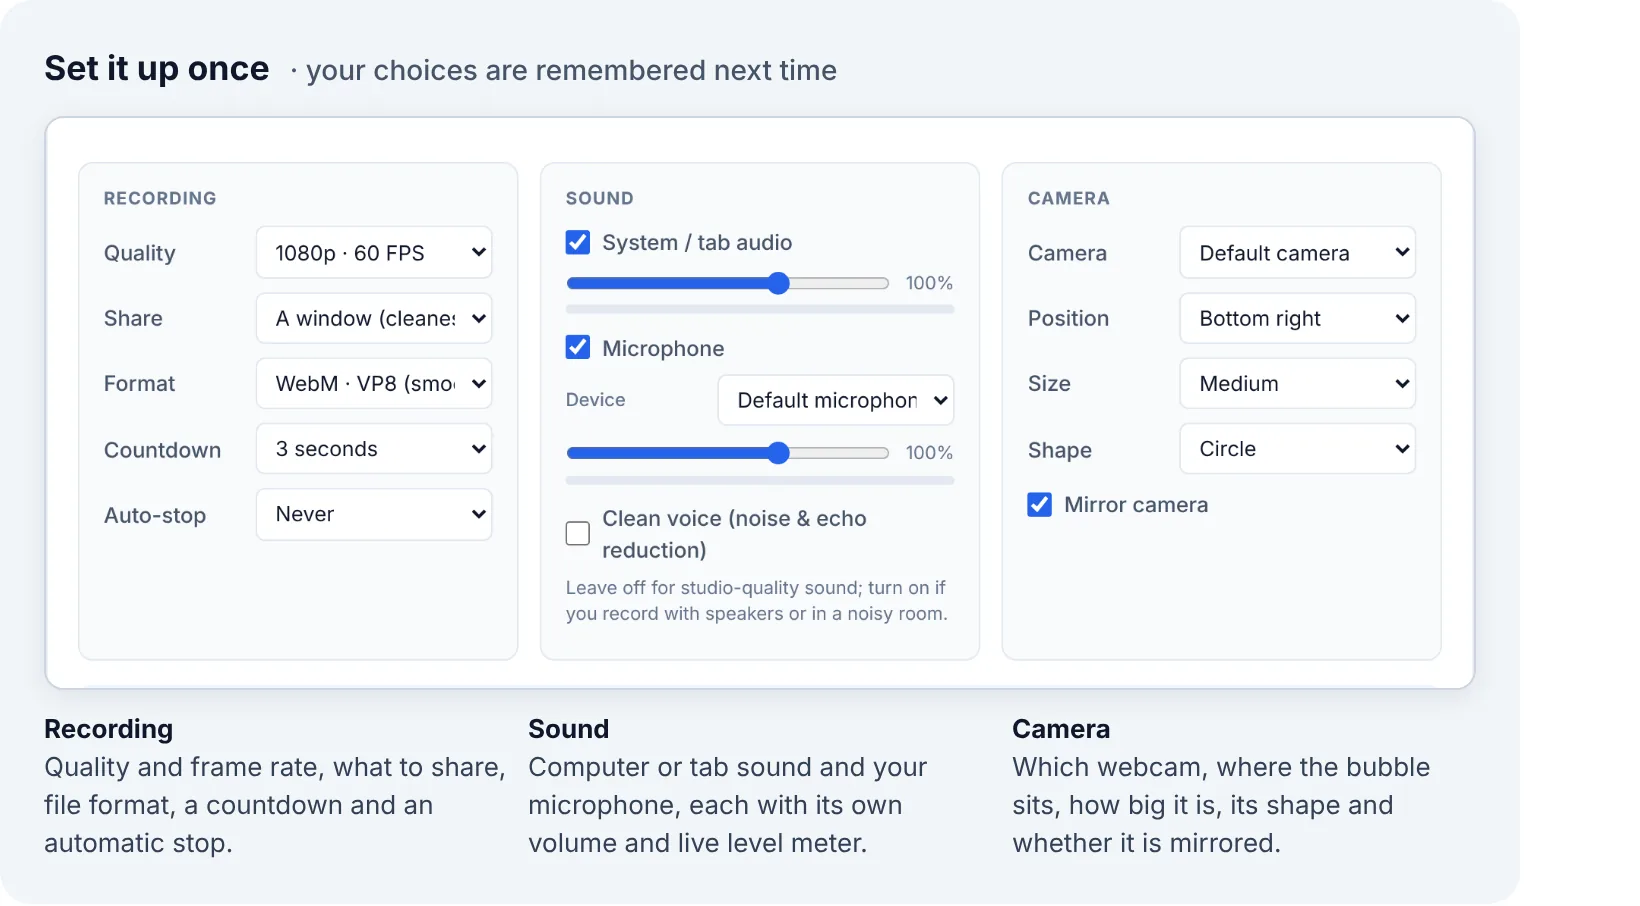
Quality sets the resolution and frame rate: 720p or 1080p at 30 frames per second, or 1080p or 1440p at 60. Resolution decides how sharp small text looks. Frame rate decides how smooth movement looks. Most screen content is text and still images, so 30 FPS is enough. Choose 60 FPS for games, animation and lots of scrolling.
Format decides which file you get. WebM · VP8 handles 60 FPS most smoothly and is the safest choice for long recordings. WebM · VP9 makes smaller files but works your processor harder. MP4 · H.264 appears if your browser is able to write MP4 itself, and it opens everywhere. If you only see WebM, record in WebM and convert to MP4 afterwards (Step 7).
Countdown gives you 3, 5 or 10 seconds to get ready after you press Start. Auto-stop ends the recording after 1 to 60 minutes. It is handy for timed lessons, or as a safety net if you might forget to press Stop.
How big will the file be? Each preset has a maximum data rate, so you can work out the worst case:
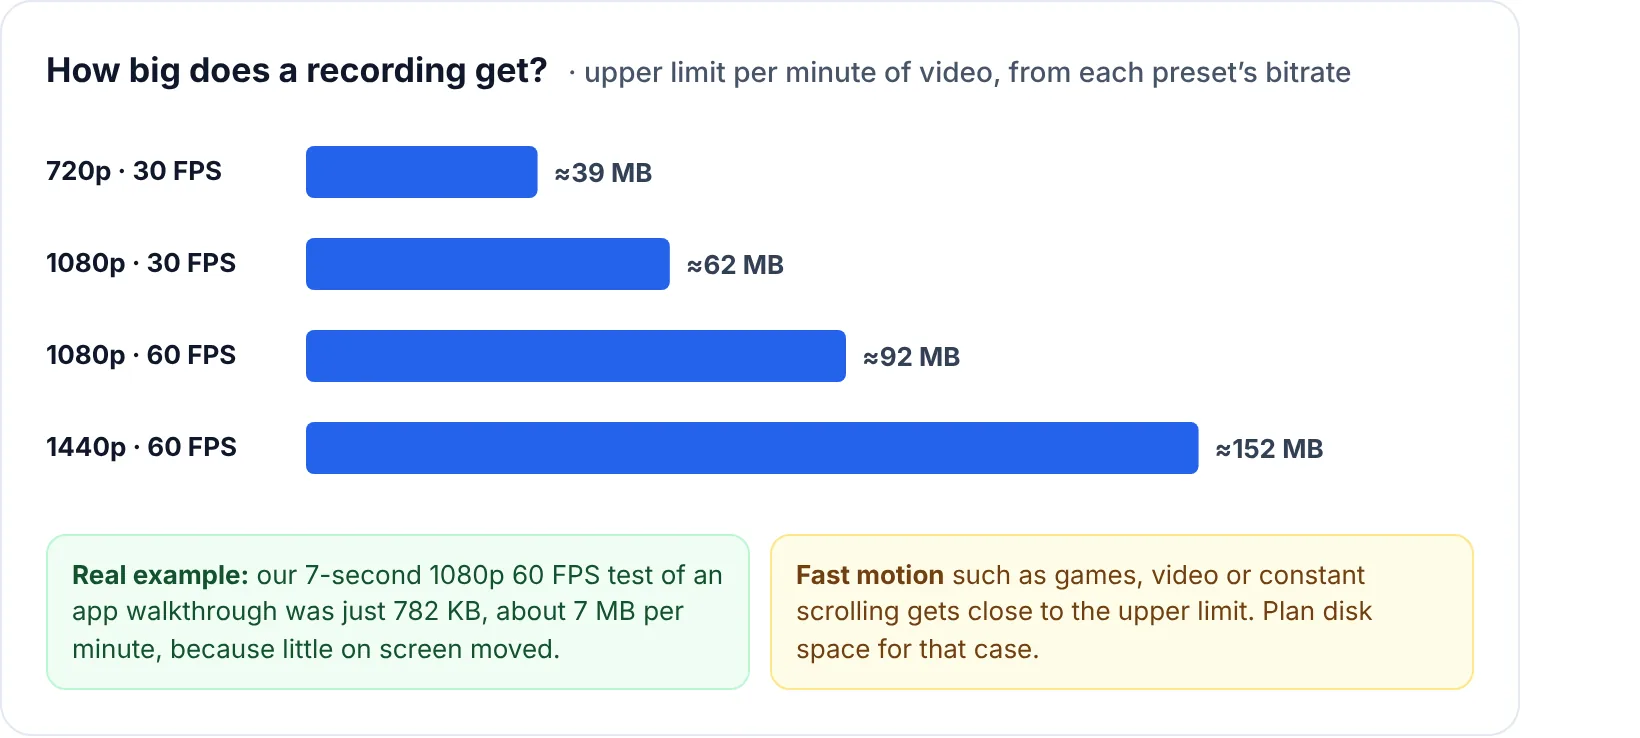
These are ceilings, not averages. The encoder only uses that much data when a lot of the picture changes at once. A typical app walkthrough at 1080p stays well under 10 MB per minute. A fast game at 1440p can come close to the limit.
| What you are recording | Quality | Format | Why |
|---|---|---|---|
| Software tutorial or how-to | 1080p · 30 FPS | MP4, or WebM converted to MP4 | Sharp text, small files, plays everywhere |
| Bug report for a developer | 720p or 1080p · 30 FPS | WebM | Quick to make and quick to upload to a ticket |
| Presentation with your face | 1080p · 30 FPS | MP4 | Slides change rarely, so smoothness matters less |
| Game, animation or design demo | 1080p or 1440p · 60 FPS | WebM · VP8 | Smooth motion without dropped frames |
| Short loop for a chat or a document | 1080p · 30 FPS | Export as GIF | Plays automatically and needs no player |
Step 3: Get the Sound Right
Missing sound is the number one screen recording complaint, and it is almost always caused by one of three things: the browser, the share choice or one unticked switch. There are two kinds of sound to think about:
- Computer sound: whatever is playing, such as a video, an app’s alerts or the other people on a call. It is captured together with the picture, only if your browser supports it and only if you switch on audio sharing when you choose what to share.
- Microphone: your voice. Tick Microphone, choose the right device if you have more than one, and watch its meter move as you speak.
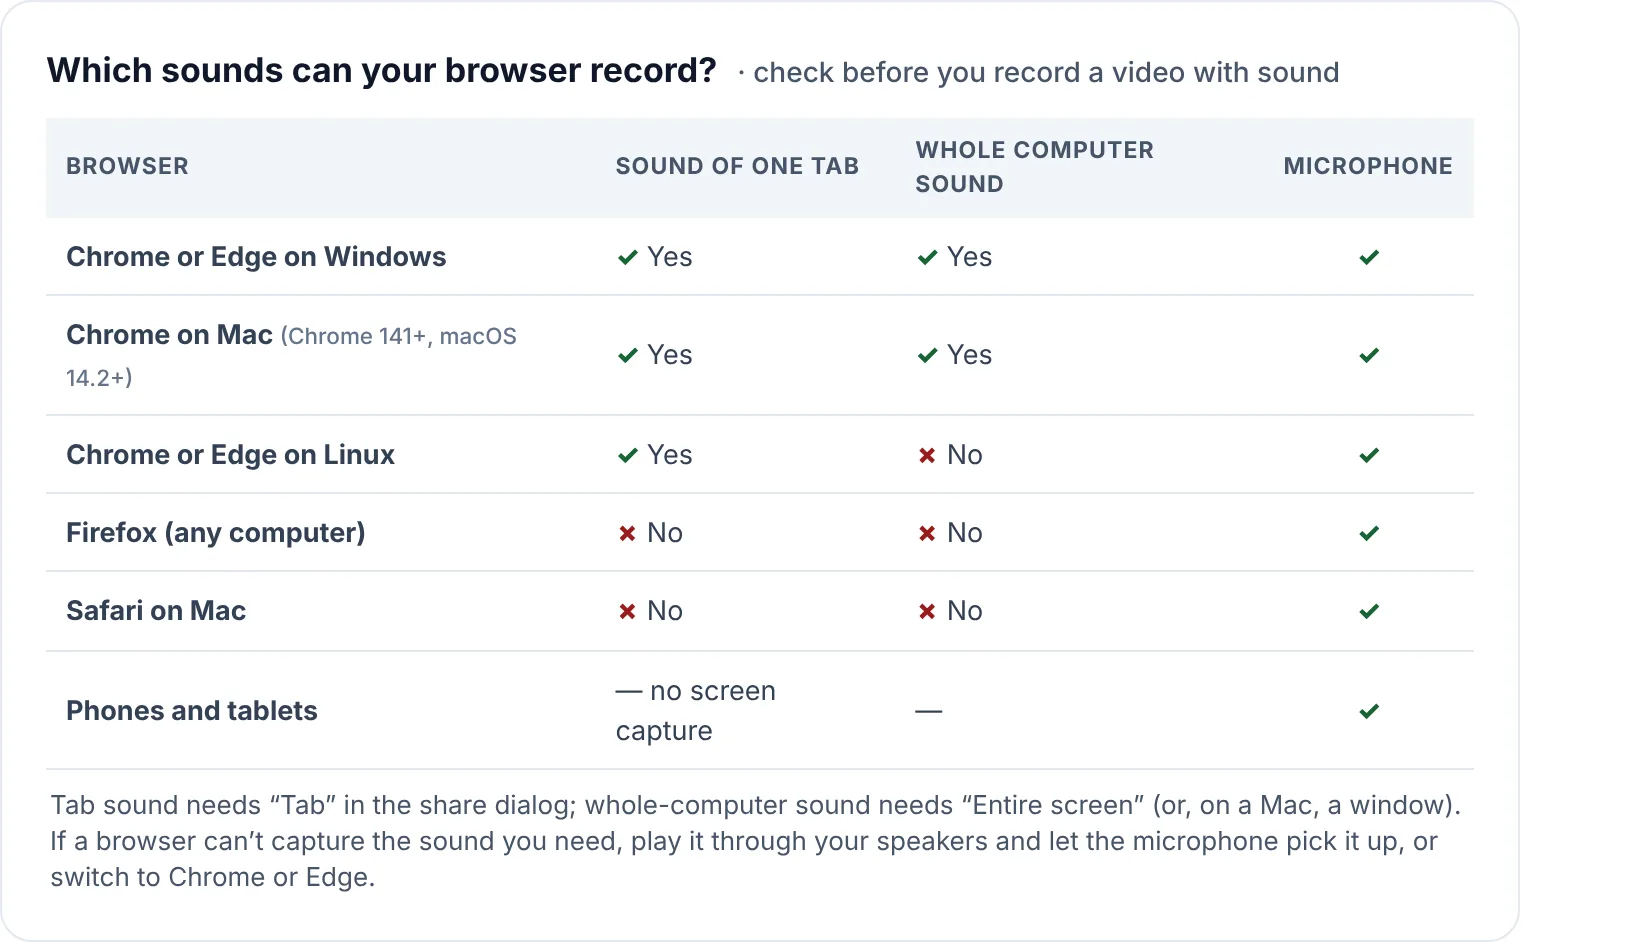
In short: Chrome or Edge on Windows can record the sound of one tab or the whole computer. Chrome on a Mac gained whole-computer sound in version 141, on macOS 14.2 or newer. Older setups can still record a single tab’s sound. Firefox and Safari ignore shared sound entirely, so with them you get your microphone and nothing else.
A few habits make the sound clean:
- Wear headphones when you talk over sound. Computer sound is recorded exactly as it plays, without echo cancellation, so it stays natural. Through speakers, your microphone also picks up that sound and the viewer hears it twice.
- Use Clean voice only when you need it. It turns on noise suppression, echo cancellation and automatic gain for the microphone. That helps in a noisy room or without headphones, but it can make a good microphone sound slightly processed.
- Balance the two sources before you start. Play a few seconds of the video or app you will record and speak at the same time. If the music drowns your voice, lower the computer sound slider; it goes from 0 to 150%.
Step 4: Add Your Webcam
In Screen + Camera mode, your webcam is drawn straight into the video as a bubble. You choose the corner, one of three sizes, and a circle or rounded rectangle.
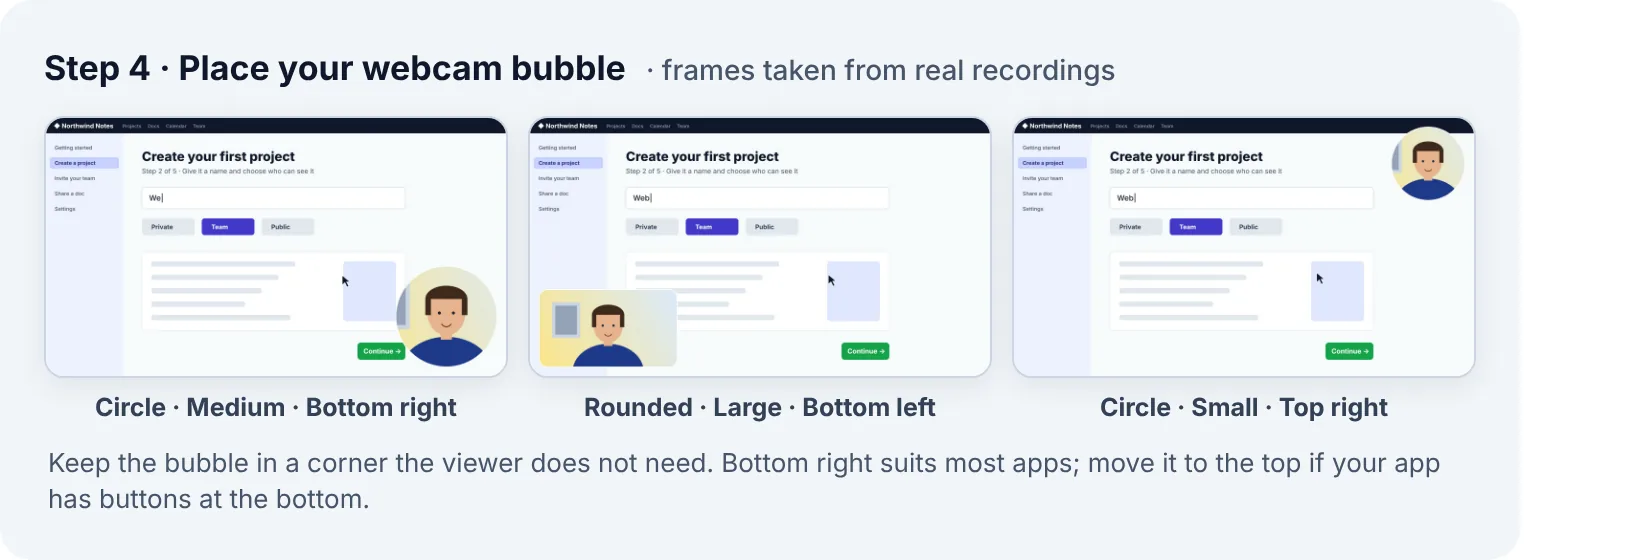
- Choose the corner the viewer never needs. Most apps keep important buttons at the top and on the right. If your bubble hides something, move it before you record, because it cannot be moved afterwards.
- Light your face from the front. A window or lamp behind the screen works well. A bright window behind you turns you into a silhouette.
- Look at the camera, not the bubble, when you speak directly to the viewer.
- Keep Mirror camera on if you like seeing yourself as in a mirror. Writing held up to the camera will look reversed, though, so turn it off if you show a document or a whiteboard.
Step 5: Start Recording and Choose What to Share
Press Start Recording, or Alt+R. Your browser now asks what to share. This window belongs to the browser, not to the website, so the website cannot see your screen until you choose.
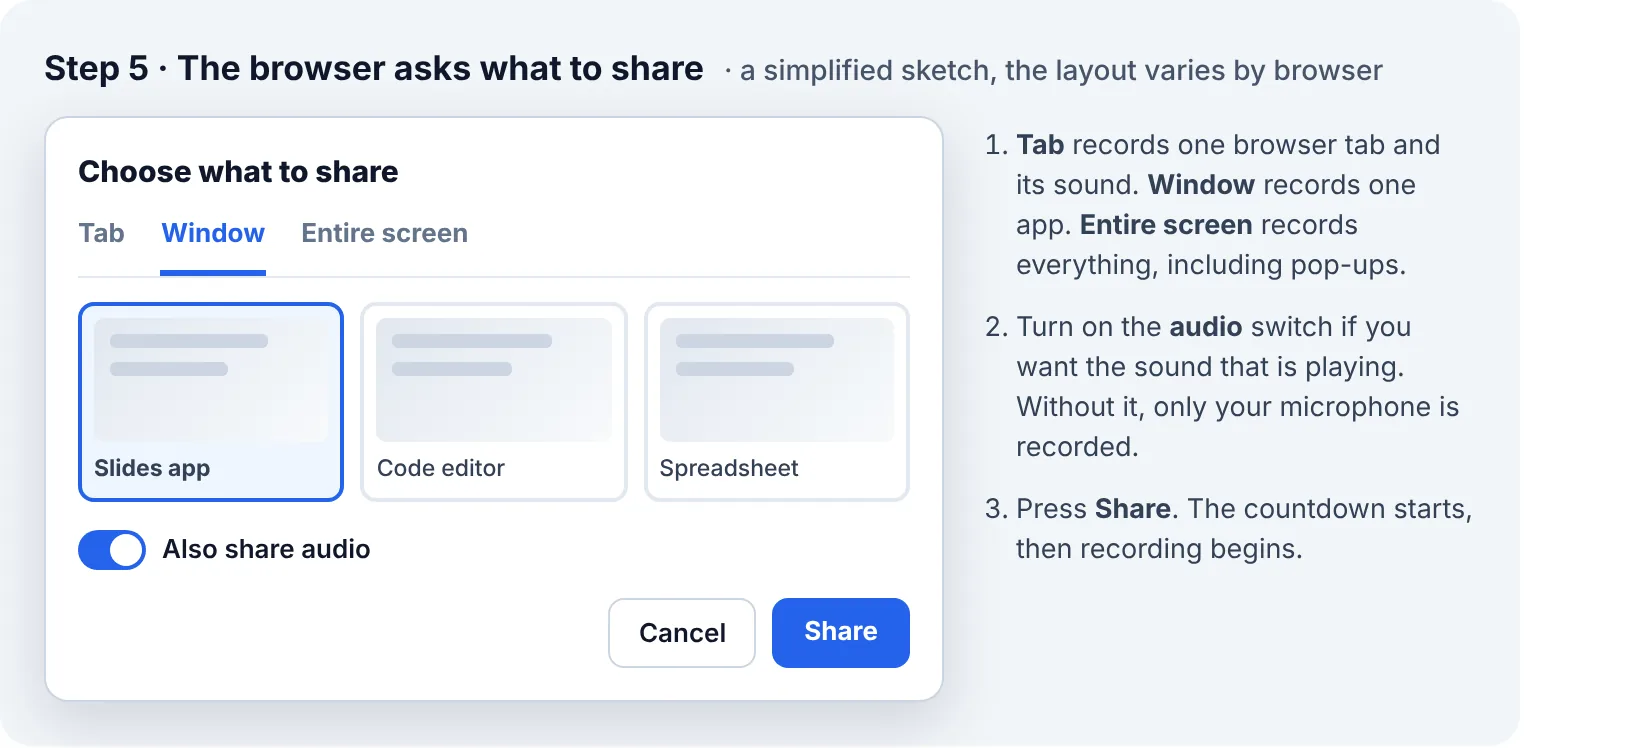
- Window is the cleanest choice for most videos: only that app is recorded, and your other windows, notifications and the browser’s own sharing bar stay out of the picture.
- Tab records one browser tab and is the most reliable way to capture that tab’s sound in Chrome and Edge.
- Entire screen is for switching between several apps. The browser shows a “you are sharing your screen” bar, so the recorder holds the countdown for at least 3 seconds and reminds you to click Hide on that bar.
Switch on the audio option in that window if you want computer sound. Then press Share, and the countdown begins.
Step 6: While You Record
During a screen recording, the recorder hides its own live preview. Otherwise your screen would show the recorder showing your screen, over and over, like two facing mirrors. The red REC badge and the browser tab title show the running time.
| Shortcut | What it does | Good for |
|---|---|---|
| Alt+R | Start recording | Starting without hunting for the button |
| Alt+P | Pause or resume | Skipping loading screens or a password entry |
| Alt+C | Save a PNG screenshot of the current frame | A thumbnail or a still for your notes |
| Alt+S | Stop and save | Finishing cleanly |
The shortcuts work while the recorder’s page is in focus. When you are working in another app, use ⧉ Mini controls, available in Chrome and Edge (and Firefox 151 or newer). It opens a small window with the timer and pause, screenshot and stop buttons, and that window stays on top of everything else. If you record the entire screen, the mini window will be in your video, so drag it to a second monitor or record a single window instead.
Pausing is the easiest way to keep a video short. Pause while something loads, while you look up a step, or before you type anything private, then resume when you are ready. The finished file joins the parts seamlessly. Your screen also stays awake during long recordings, and if you click the browser’s own Stop sharing button, the recording stops and is saved, not lost.
Step 7: Review, Trim, Convert and Save
When you stop, the recording opens in a player with its format, size, length and resolution. WebM files are automatically repaired so that players can show their length and you can jump to any point. Many browser recorders skip this step.
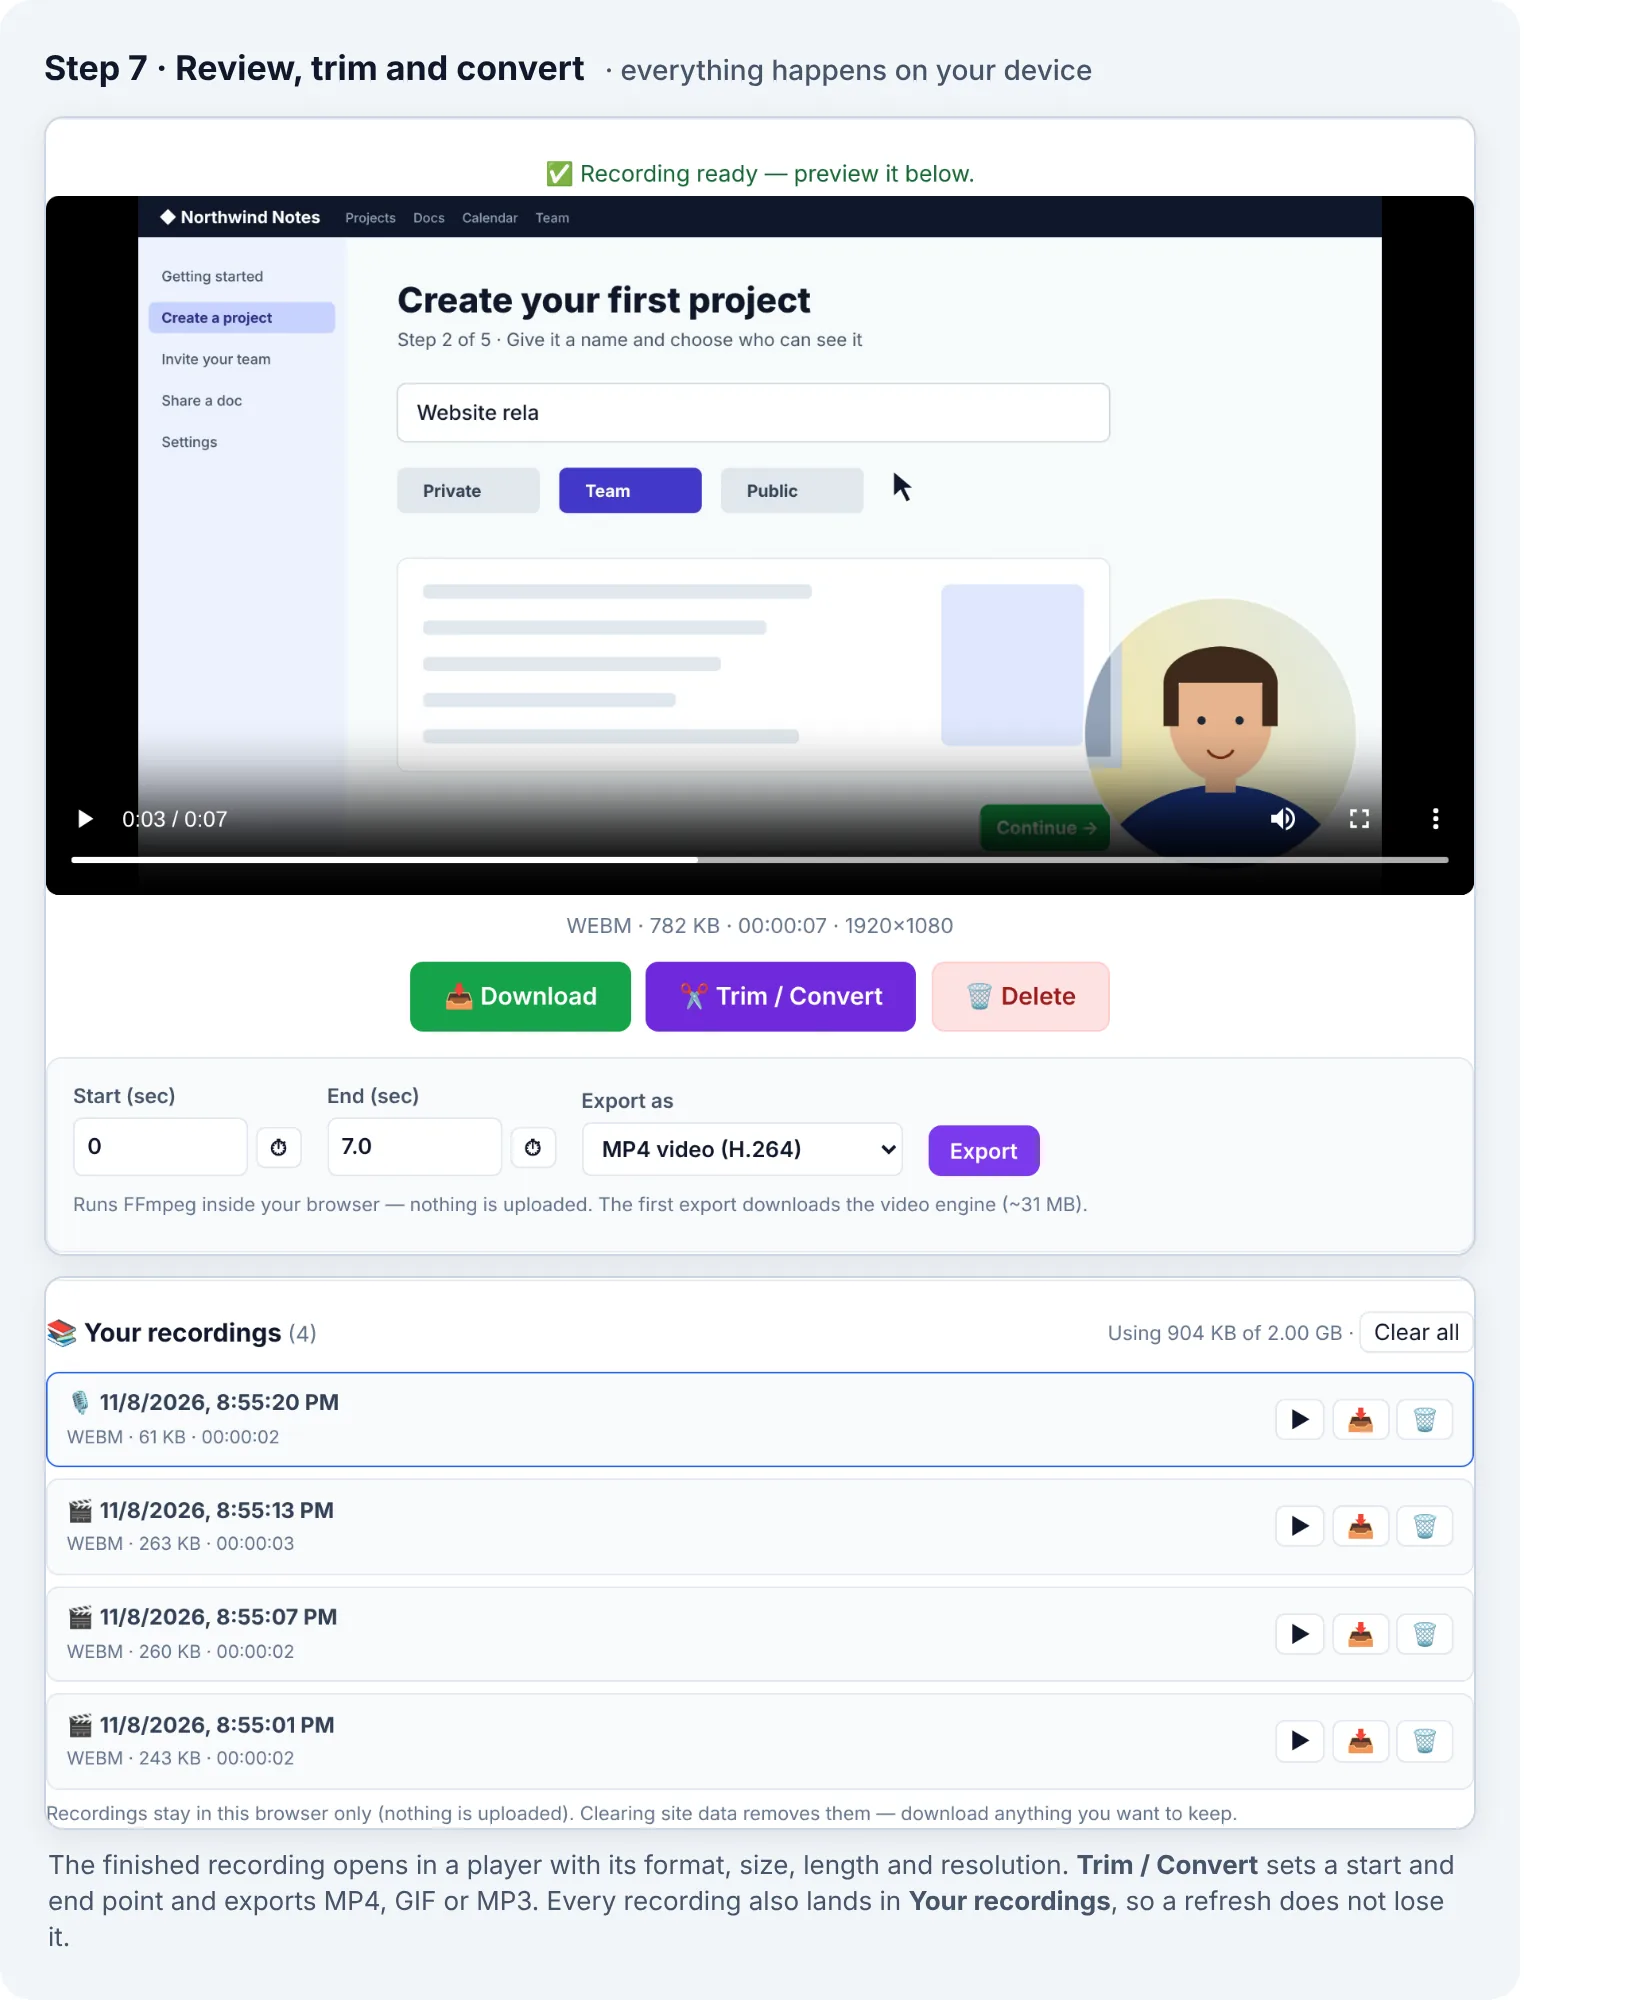
To cut off the first and last seconds, open Trim / Convert, play to the right moment, and press the ⏱ button next to Start or End to use the current position. Then choose what to export:
| Export as | Use it for | Good to know |
|---|---|---|
| MP4 (H.264) | Video editors, phones, social networks, email | The most compatible video file. Keeps the original frame rate. |
| Animated GIF | Short loops in chats, docs and support articles | Up to 30 seconds, 640 pixels wide, no sound |
| MP3 | A talk, lesson or podcast draft without the picture | 192 kbps audio, playable anywhere |
Conversion runs on your own computer with FFmpeg, the same open-source engine used by many video apps, compiled to run in the browser. The first export downloads that engine (about 31 MB), so it takes a moment. Later exports start straight away. MP4 and MP3 exports are added to your library next to the original, so nothing is overwritten, and GIFs are downloaded straight away.
Your recordings lists everything you have recorded in this browser, so a refresh or a closed tab does not lose your work. They are stored only on this device. Save a copy of anything important, because clearing the browser’s site data deletes the library.
Recording on a Phone or Tablet
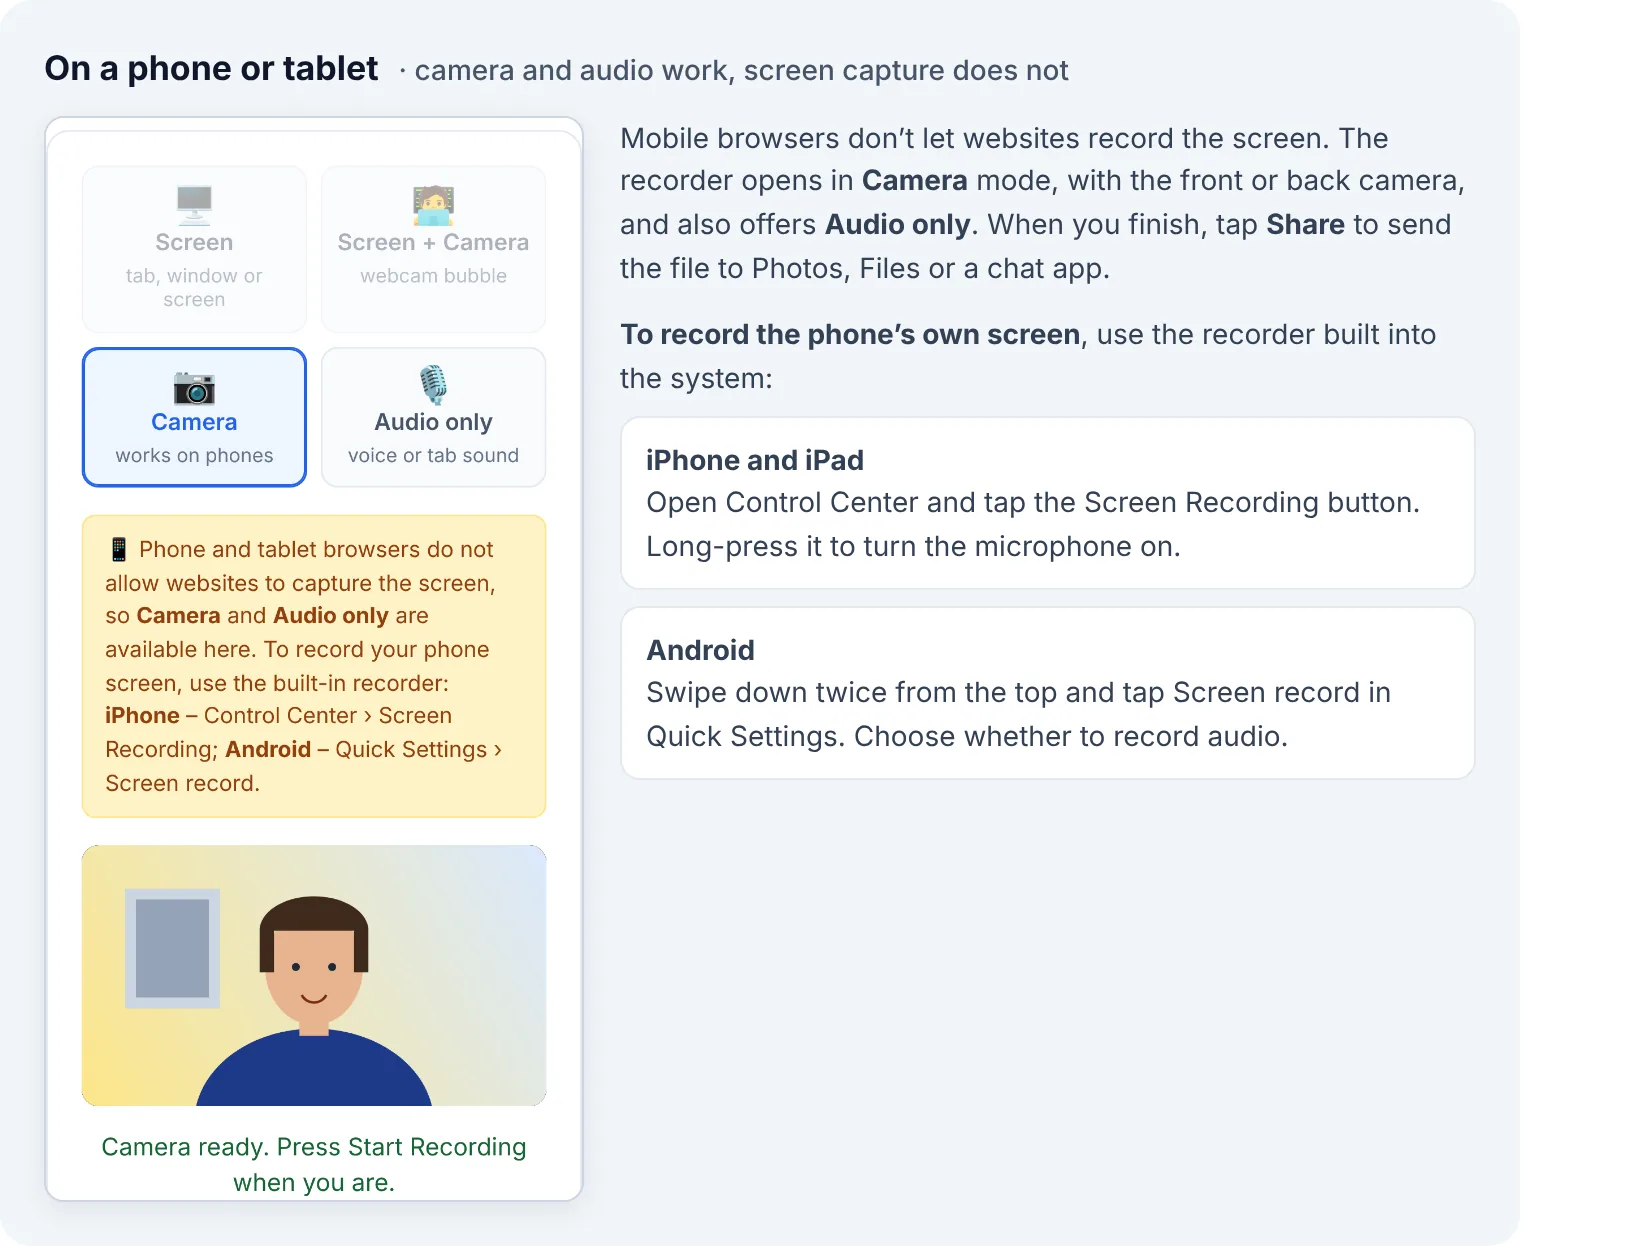
No mobile browser lets a website capture the screen, so on a phone the recorder opens in Camera mode, with the front or back camera, and also offers Audio only. That is ideal for a quick video message or a voice note. When you finish, tap Share to pass the file to your Photos app, Files, a chat or email. To record the phone’s own screen, use the recorder built into iOS or Android, as described in the image above.
Fixing Common Problems
The video has no sound
First check that you switched on audio sharing in the browser’s share window, and that System / tab audio is ticked in the recorder. Then check your browser in the table in Step 3. In Firefox and Safari, only the microphone can be recorded. Finally, check that the sound was actually playing in the tab or window you chose.
Your voice sounds doubled or echoey
The microphone is picking up your speakers. Wear headphones, or turn on Clean voice, which removes most of that echo.
Part of the video is black
Many streaming services and some paid video players protect their content so it cannot be captured. The protected area turns black on purpose. That is the provider’s copy protection working, not a recorder fault, and the content is not meant to be recorded.
Movement looks choppy
Switch the format to WebM · VP8, lower the quality to 1080p, and close heavy tabs and apps. On older laptops, 30 FPS gives a steadier result than 60 FPS that the computer cannot keep up with.
Your editor will not open the file
Some editors and phones do not accept WebM. Use Trim / Convert to export MP4 (H.264), which every editor reads.
Export fails or never starts
The conversion engine is downloaded the first time, so an ad blocker, a strict network or no internet connection can stop it. Try again on another network, or with extensions paused. Files over roughly 1.5 GB are too big to convert in a browser, so export a shorter section.
The recording stopped by itself
Check whether Auto-stop was set. Recording also ends if the shared window is closed or you press the browser’s Stop sharing button. In every case, what was recorded up to that point is saved.
Record Responsibly
- Ask before you record people. Recording a video call or a meeting can require everyone’s permission, and the rules differ between countries and states. Saying “I’m recording this, is that OK?” at the start covers both good manners and most legal requirements.
- Check what is on screen. Passwords, email previews, customer data and browser bookmarks are easy to forget. Record a single window, and pause while you type anything private.
- Respect copyright. Recording your own work, software you are demonstrating or a meeting you are part of is fine. Copying films, paid courses or other people’s videos to share is not.
Frequently Asked Questions
How do I record my screen with audio for free?
Open the Screen Recorder in Chrome or Edge, keep System / tab audio ticked, press Start Recording, choose a tab or window, and switch on audio sharing in the browser’s share window. Tick Microphone as well if you want to talk over it. There is no watermark or time limit.
Can I record a Zoom, Teams or Google Meet call?
Technically yes. Share the call’s browser tab with audio, or, for a desktop app, share the entire screen with system sound (Chrome or Edge on Windows, or Chrome 141+ on macOS 14.2+). Tick Microphone so your own voice is included. Always tell the other participants and get their agreement first.
Where are my recordings saved?
In your browser’s storage on this device, listed under Your recordings. Nothing is uploaded. Use Download to save a copy to your Downloads folder, and keep it there if the recording matters.
How long can I record?
As long as your device’s memory and free disk space allow. For sessions over an hour, record in 30 to 60-minute parts. Auto-stop can end each part for you.
Can I record only part of my screen?
Record a single window rather than the whole screen, and resize that window to frame what you want to show. That is the cleanest way to keep everything else out of the shot.
Can I install it like an app?
Yes. In browsers that support it, the recorder offers an Install app button so it opens in its own window from your desktop or dock. On an iPhone or iPad, use Share › Add to Home Screen in Safari.
Start Your First Recording
Open the free Screen Recorder, choose a mode, and do a ten-second test with sound before the real take. Check the result, adjust the levels, then record the real thing. With a little practice, a clear one-minute video takes less time than writing the email it replaces.
Sources
- Chrome for Developers — Privacy-preserving screen sharing controls
- Pipe — Capturing the screen with system sounds on Chrome on macOS
- Mozilla Bugzilla — Implement audio capture for getDisplayMedia (bug 1541425)
- Chrome for Developers — Picture-in-Picture for any element
- Apple Support — Record the screen on your iPhone, iPad or iPod touch
- Android Help — Take a screenshot or record your screen